Photo Stacking to improve your long exposure images
This post will help you improve your long-exposure skills and overcome the most common challenges that occur in daytime long-exposure photography.
Photo Stacking for Daytime Long-Exposures
When doing long-exposure photography–photography that requires light to hit your camera sensor for more than 2 minutes a lot of problems can arise and those can easily ruin your shot: false light, camera shake, accidentally tripping over your tripod, etc.
With exposure time around 4 minutes, you can easily waste a lot of time trying to capture the perfect shot of soft clouds or silky waves.
But by dividing the shot into several shorter exposures of the same subject and stacking them together in Photoshop, you can overcome most of the issues, spend less time on wasted shots, and come away with better images.
Photo stacking is not a technique for every situation, but sometimes stacking your long-exposures is the only way to get a good shot. However, it is important to recognise when you need it during shooting.
When to Use Photo Stacking
False Light
During the day, you’ll often have too much light available for long-exposure photography. Long-exposure photography in daytime light using a 10 stop ND-filter might still result in an overexposed shot.
At night or during the blue hour, when the light is limited, you can adjust your camera settings to give you a 2 or 4 minutes exposure even without using neutral density filters.

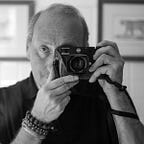
This long-exposure image consists of 4 shots of 40 seconds each. I was standing on a metal bridge and there is often passage of heavy trolleys and people
Photo stacking your daytime long-exposure photos will ensure that you get correctly exposed shots. Furthermore, if you don’t own a 10 stop neutral density filter, using a less strong ND-filter and taking multiple images to combine later will give you similar results.
Camera Shake
Next to false light, shaking is the most common reason for failed shots in long-exposure photography.
At night, factors that can cause your tripod and camera to shake are usually lessened: lighter wind, fewer waves, and less traffic, for example.
But during the day, these factors are stronger, heavier, and more problematic for daytime long-exposure photography; strong wind or heavy traffic can make your tripod shake or vibrate, resulting in blurred or unsharp shots.
While we’re at it, remember to take the camera strap off your camera while shooting long-exposure. It acts as a sail in the wind and causes shaking to the tripod and camera.
And make sure the ground is sturdy enough to support your tripod and keep the camera steady for a long-exposure shot.
User Error
And then there are those unforeseen hiccups that can ruin a great long-exposure shot.
Regardless of whether its daytime or night, another common mistake is simply forgetting your remote. Without a remote, you are stuck with the longest exposure time your camera allows excluding bulb mode.
Bulb-mode without a remote requires that you press the shutter all the time, which is a no-go to avoid camera shake. My camera, like most, has a max of 30 seconds exposure.
How to Photo Stack Long-Exposure Photos
Factors like too much light, too much wind, or the risk of camera shake make it worthwhile to use photo stacking for your daytime long-exposure photos instead of doing a 2- or 4-minute exposure.
You now know when to use photo stacking; below you will learn how to use photo stacking–how to do it in the field and how to blend the exposures afterwards in Photoshop.
Equipment
This is the equipment I tend to use for Long Exposure shots
https://kit.com/marcosecchi/long-exposure-kit
Setting Up Your Camera
At the location, set up your gear as normal, but make sure your camera settings and ND-filters gives a good exposure with a histogram peaking just over the middle to the right when using an exposure time of 30 seconds. To get the effect of a 4-minute shot, aim for 8 good shots, each at 30 seconds (8 x 30 seconds = 4 minutes).
Get some extra exposures just in case some of them get blurred due to camera shake from a sudden wind gust or bypassing bus. You can leave out a particular shot from your sequence in the photo stacking process.
Processing in Photoshop
In Photoshop, go to File → Scripts → Load Files into Stack. In the appearing dialogue, choose Add Open Files to make the set of images appear under files to use for stacking.
Remember to check the boxes Attempt to Automatically Align Source Images and Create Smart Object after Loading Layers.
Click OK to begin the blending process. It usually takes some time for Photoshop to create a single Smart Object from all of the exposures.
Next, go to the menu Layer → Smart Objects → Stack Mode → Mean. This makes Photoshop automatically blend the images in the stack into a smooth long-exposure, to look like it was a single very long exposure.
At this point, you don’t need the layer to be a Smart Object anymore, and keeping it this way would prevent you from using a brush tool, for example, so you should convert it by right-clicking on the layer and choose to Rasterize Layer.
After this, you need to process the image as you would for a normal daytime long-exposure or any other image. To get the best results when you process your daytime long-exposure photos, be sure to only use selective sharpening of the areas in your photo that are not moving.
Long-exposures taken during daytime often have a lot of large white areas with clouds or silky soft water. If you apply sharpening to the areas that are supposed to be soft, you’ll cause an unwanted grainy look to your photo.
Originally published at www.msecchi.com January 26, 2018